Set up BigQuery OAuth EnterpriseEnterprise +
This guide describes a feature available on dbt Enterprise and Enterprise+ plans. If you’re interested in learning more about our Enterprise-tier plans, contact us at sales@getdbt.com.
dbt supports OAuth with BigQuery, providing an additional layer of security for dbt enterprise users.
Set up BigQuery native OAuth
When BigQuery OAuth is enabled for a dbt project, all dbt developers must authenticate with BigQuery to access development tools, such as the Studio IDE.
To set up BigQuery OAuth in dbt, a BigQuery admin must:
- Locate the redirect URI value in dbt.
- Create a BigQuery OAuth 2.0 client ID and secret in BigQuery.
- Configure the connection in dbt.
To use BigQuery in the Studio IDE, all developers must:
- Authenticate to BigQuery in the their profile credentials.
Locate the redirect URI value
To get started, locate the connection's redirect URI for configuring BigQuery OAuth. To do so:
- Navigate to your account name, above your profile icon on the left side panel
- Select Account settings from the menu
- From the left sidebar, select Projects
- Choose the project from the list
- Select Connection to edit the connection details
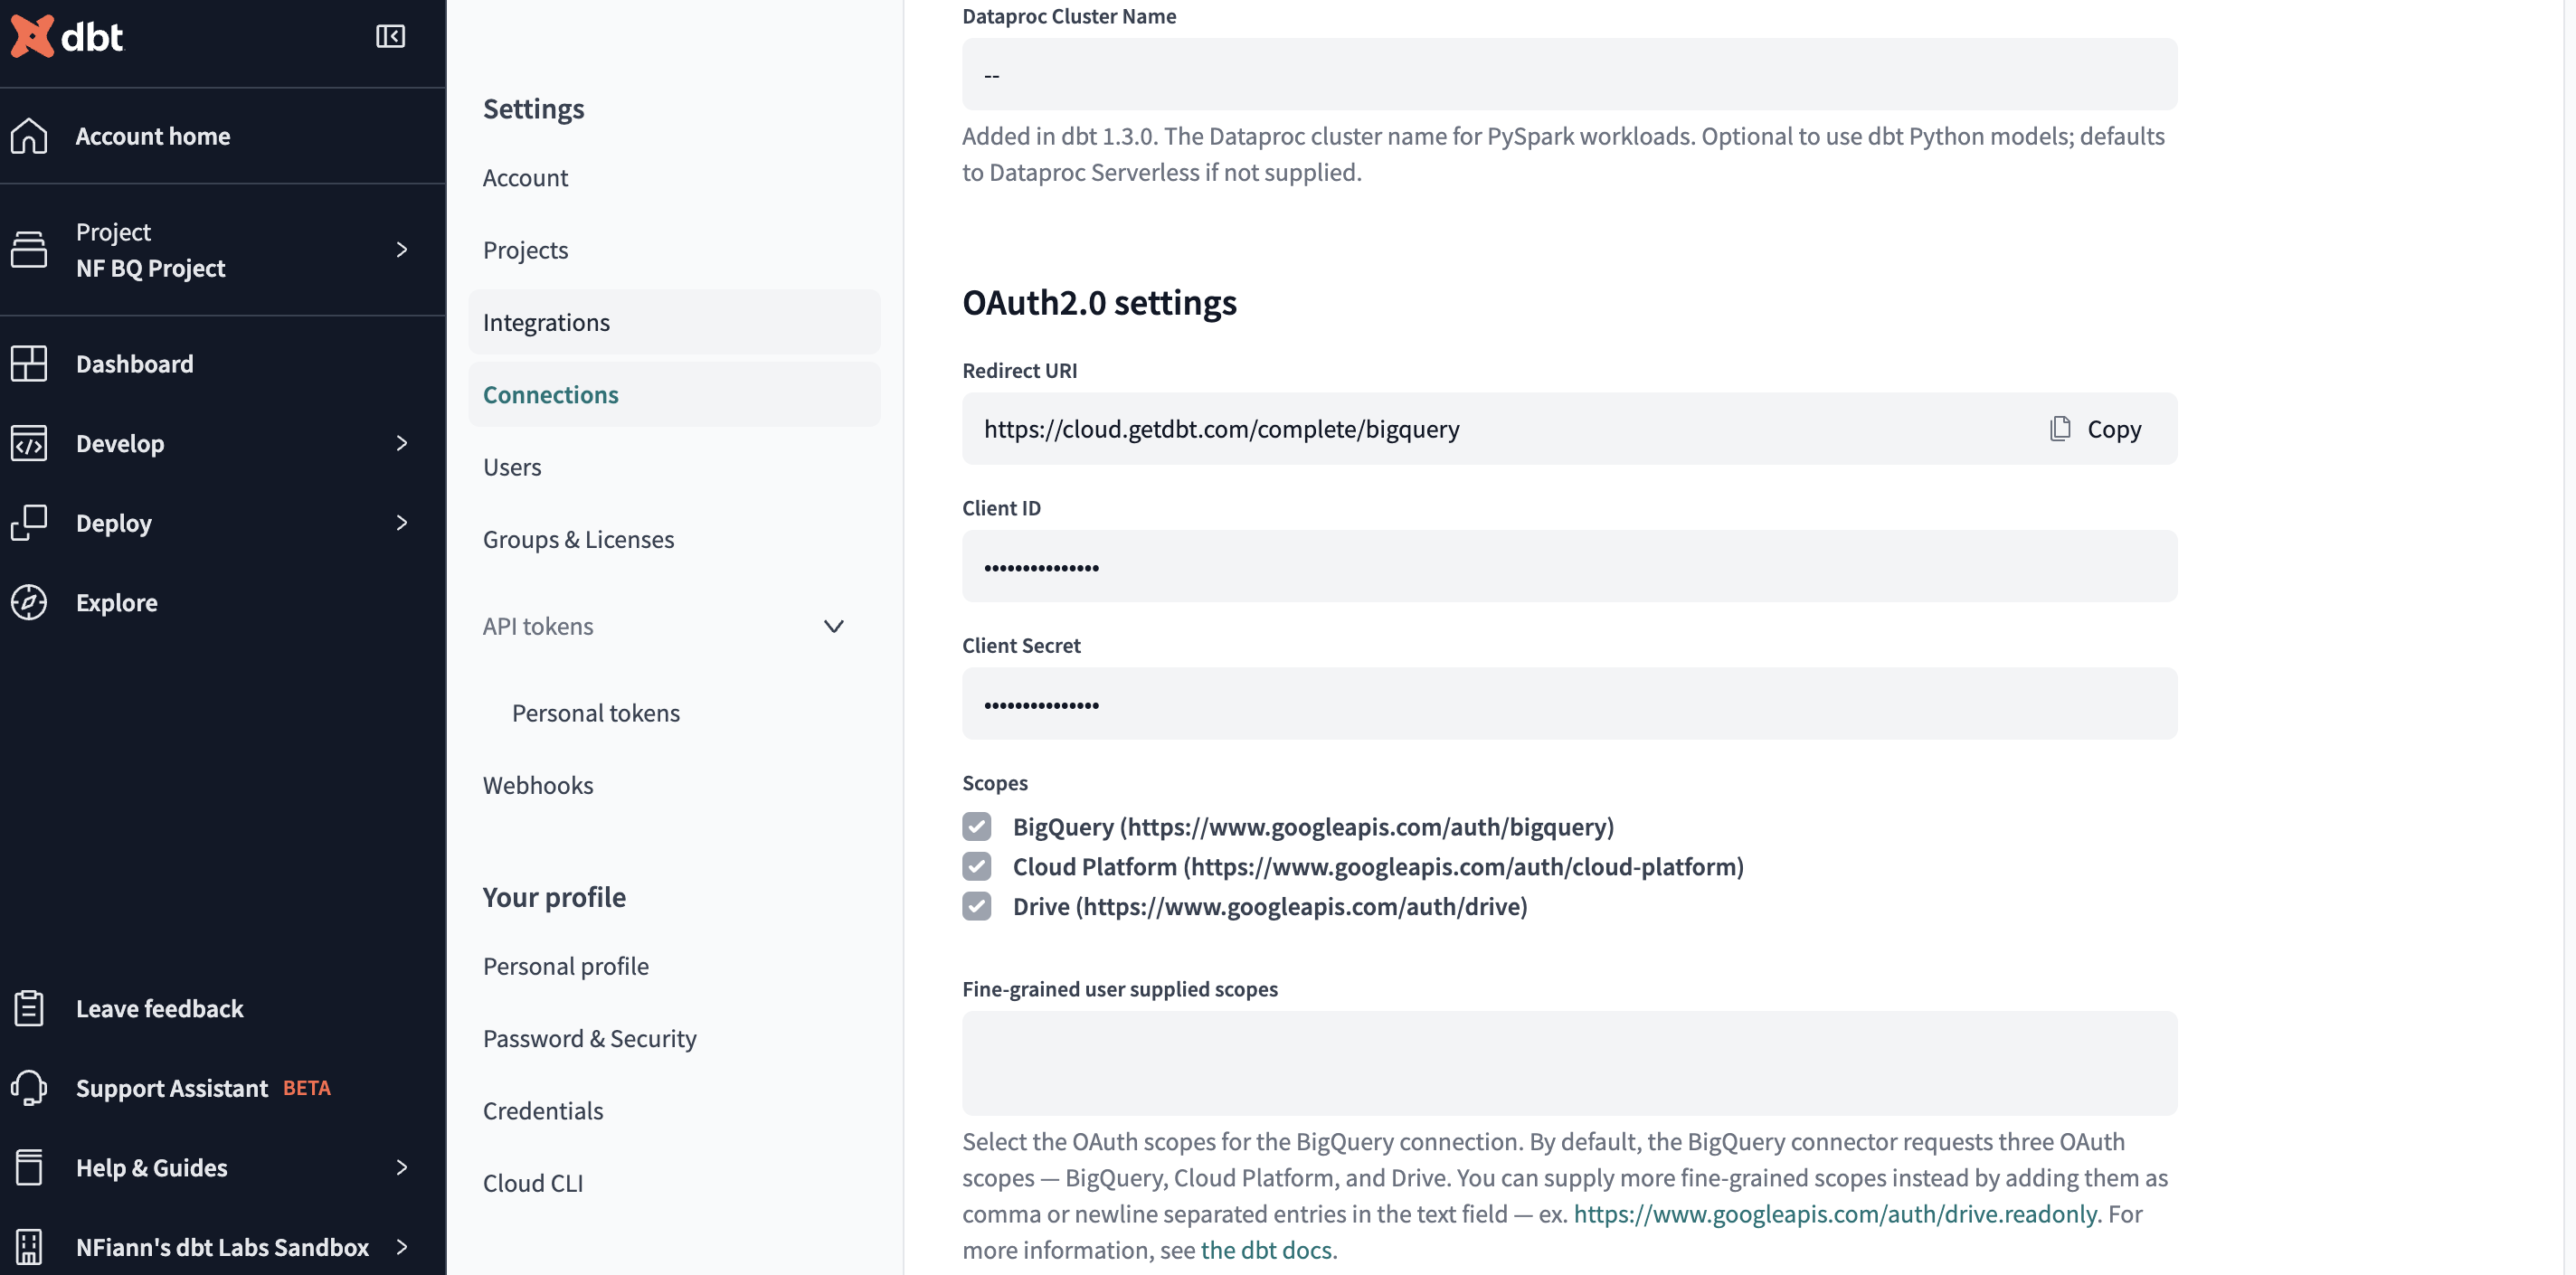
- Locate the Redirect URI field under the OAuth 2.0 Settings section. Copy this value to your clipboard to use later on.
Creating a BigQuery OAuth 2.0 client ID and secret
To get started, you need to create a client ID and secret for authentication with BigQuery. This client ID and secret will be stored in dbt to manage the OAuth connection between dbt users and BigQuery.
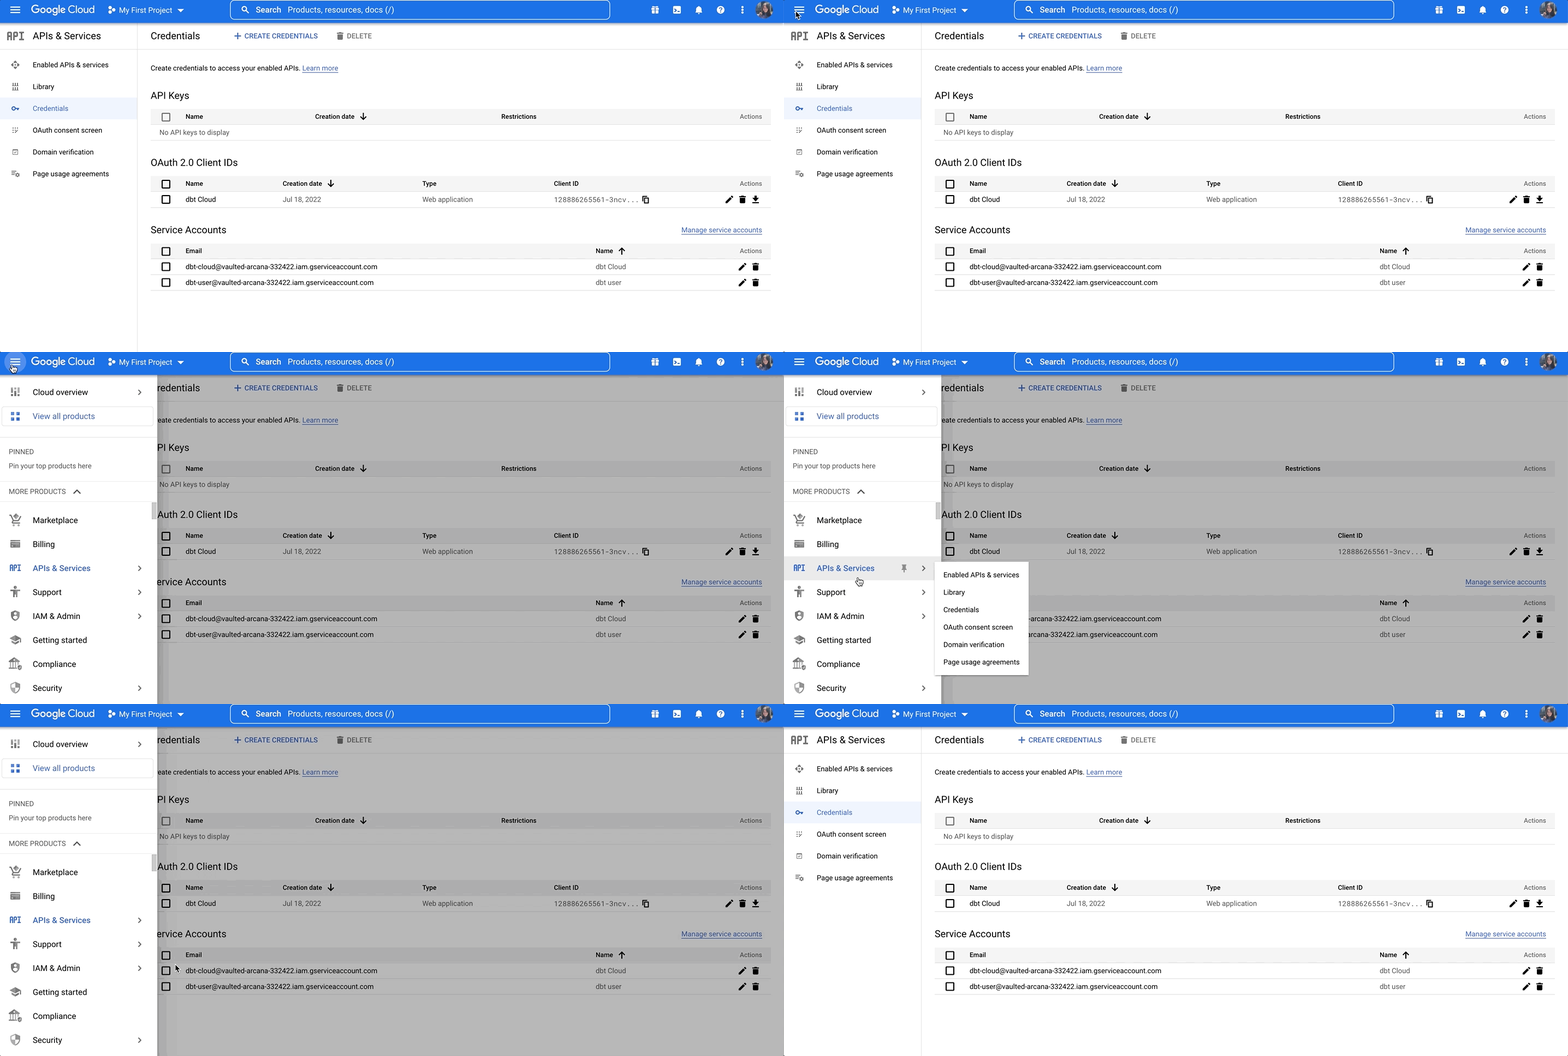
In the BigQuery console, navigate to APIs & Services and select Credentials:
On the Credentials page, you can see your existing keys, client IDs, and service accounts.
Set up an OAuth consent screen if you haven't already. Then, click + Create Credentials at the top of the page and select OAuth client ID.
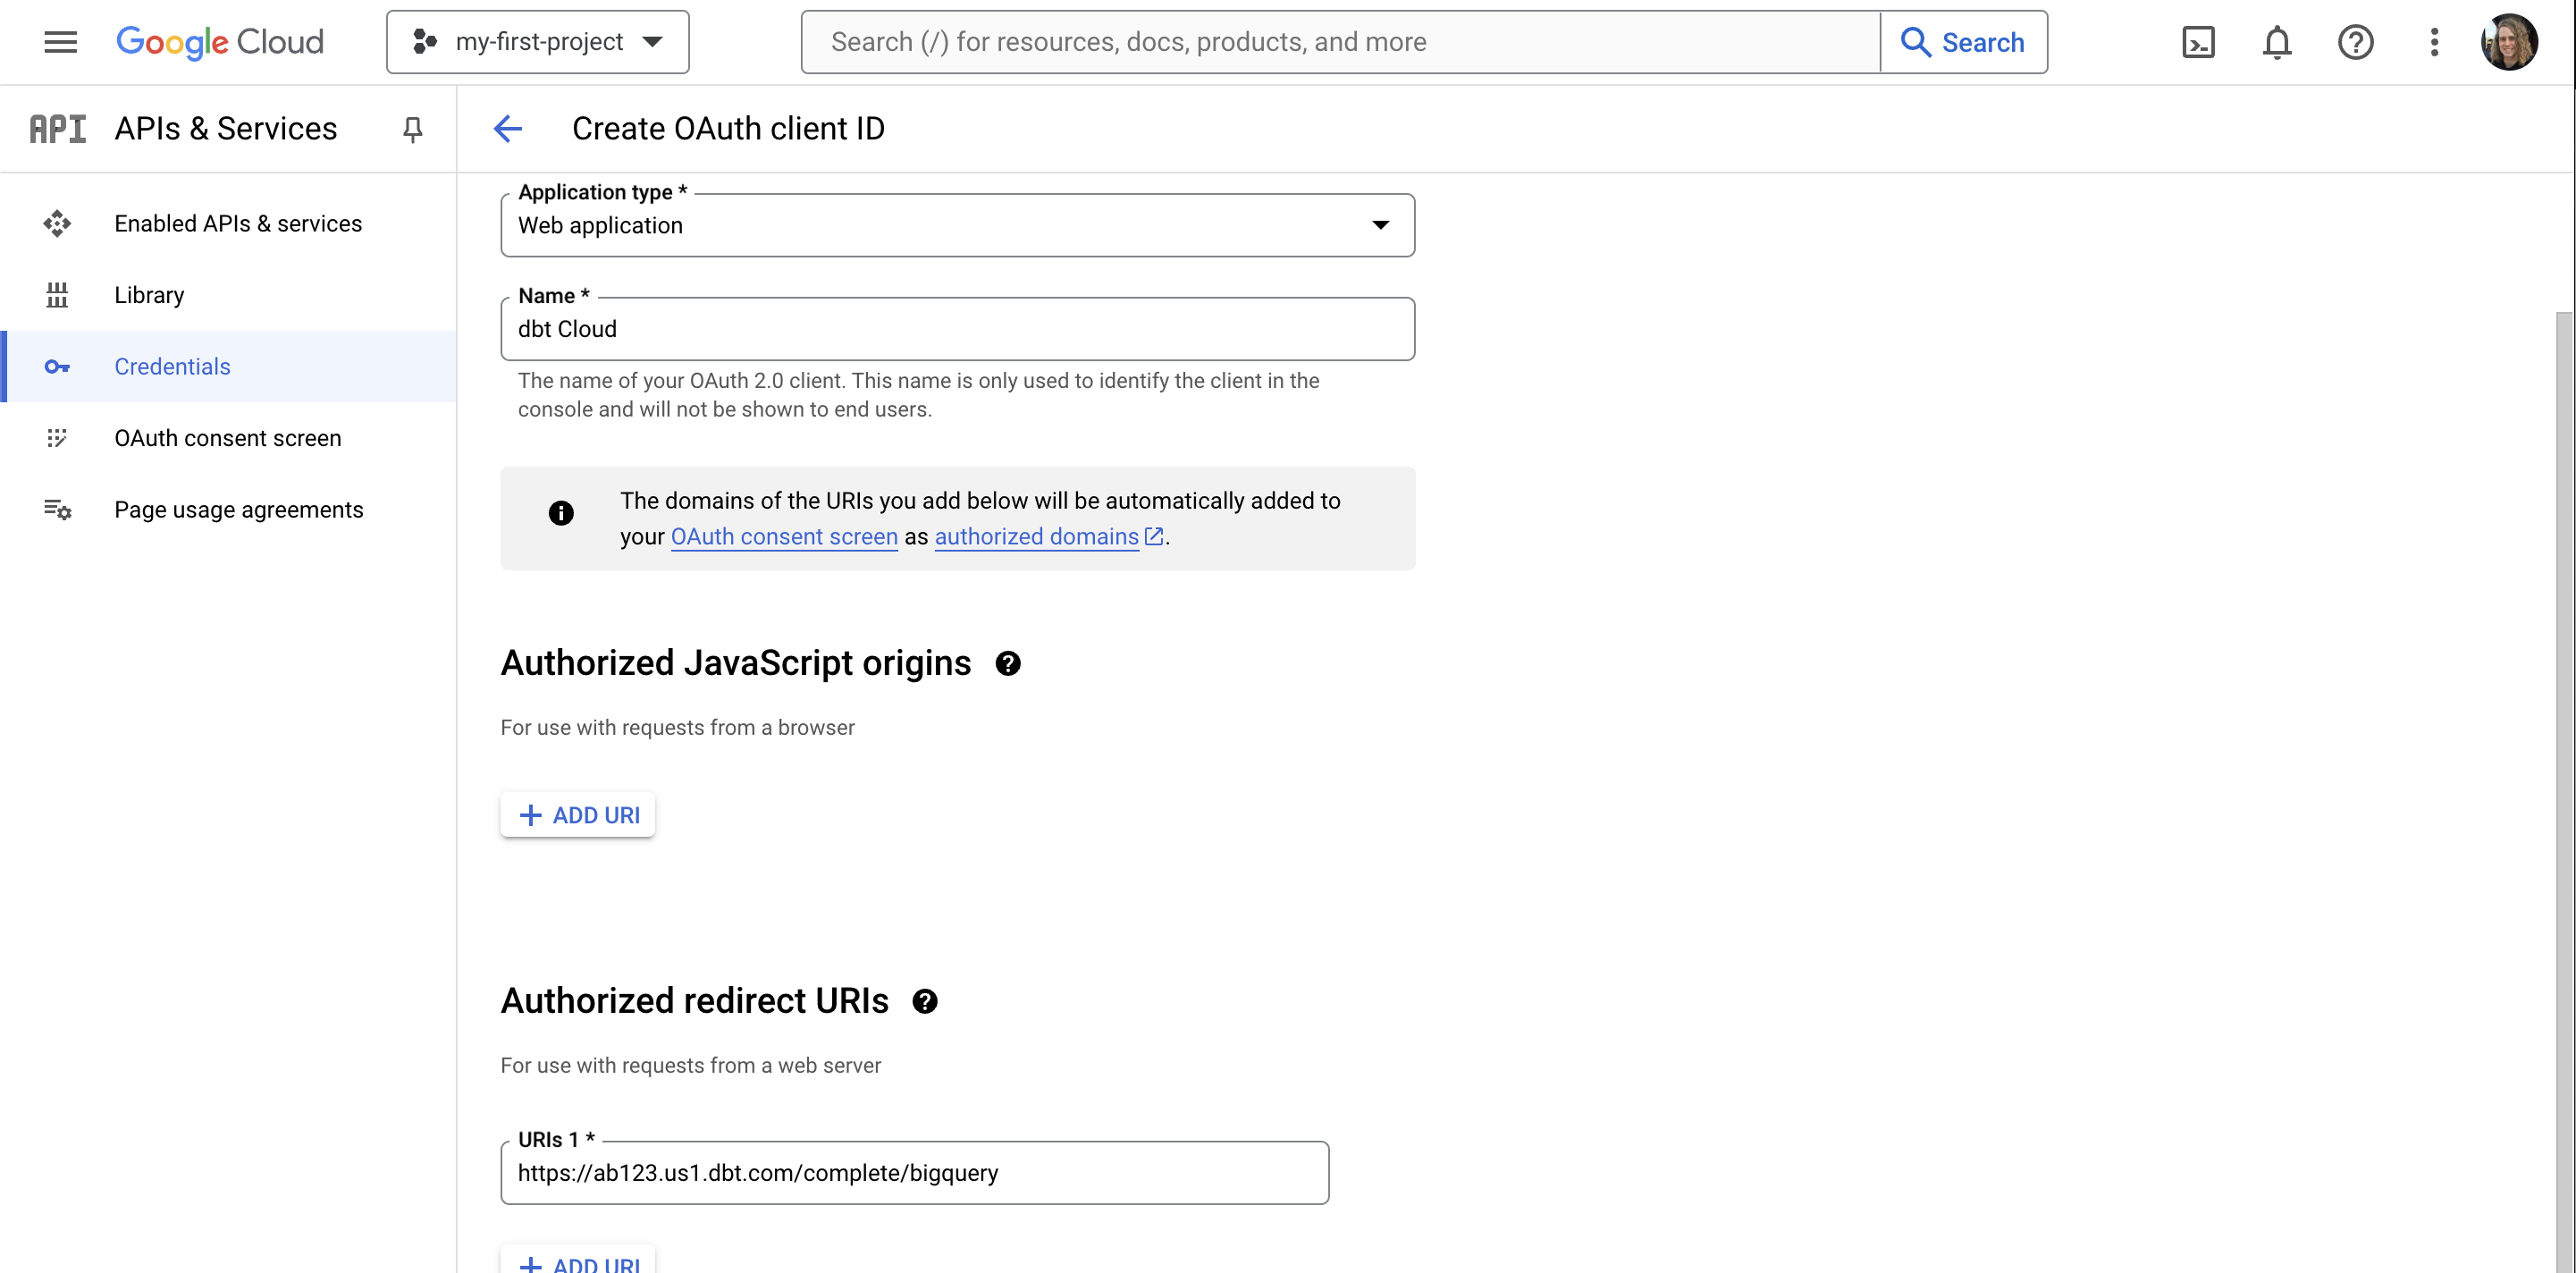
Fill in the client ID configuration. Authorized JavaScript Origins are not applicable. Add an item to Authorized redirect URIs and replace REDIRECT_URI with the value you copied to your clipboard earlier from the connection's OAuth 2.0 Settings section in dbt:
| Config | Value |
|---|---|
| Application type | Web application |
| Name | dbt |
| Authorized redirect URIs | REDIRECT_URI |
Then click Create to create the BigQuery OAuth app and see the app client ID and secret values. These values are available even if you close the app screen, so this isn't the only chance you have to save them.
Configure the Connection in dbt
Now that you have an OAuth app set up in BigQuery, you'll need to add the client ID and secret to dbt. To do so:
- Navigate back to the Connection details page, as described in Locate the redirect URI value.
- Add the client ID and secret from the BigQuery OAuth app under the OAuth 2.0 Settings section.
- Enter the BigQuery token URI. The default value is
https://oauth2.googleapis.com/token.
Authenticating to BigQuery
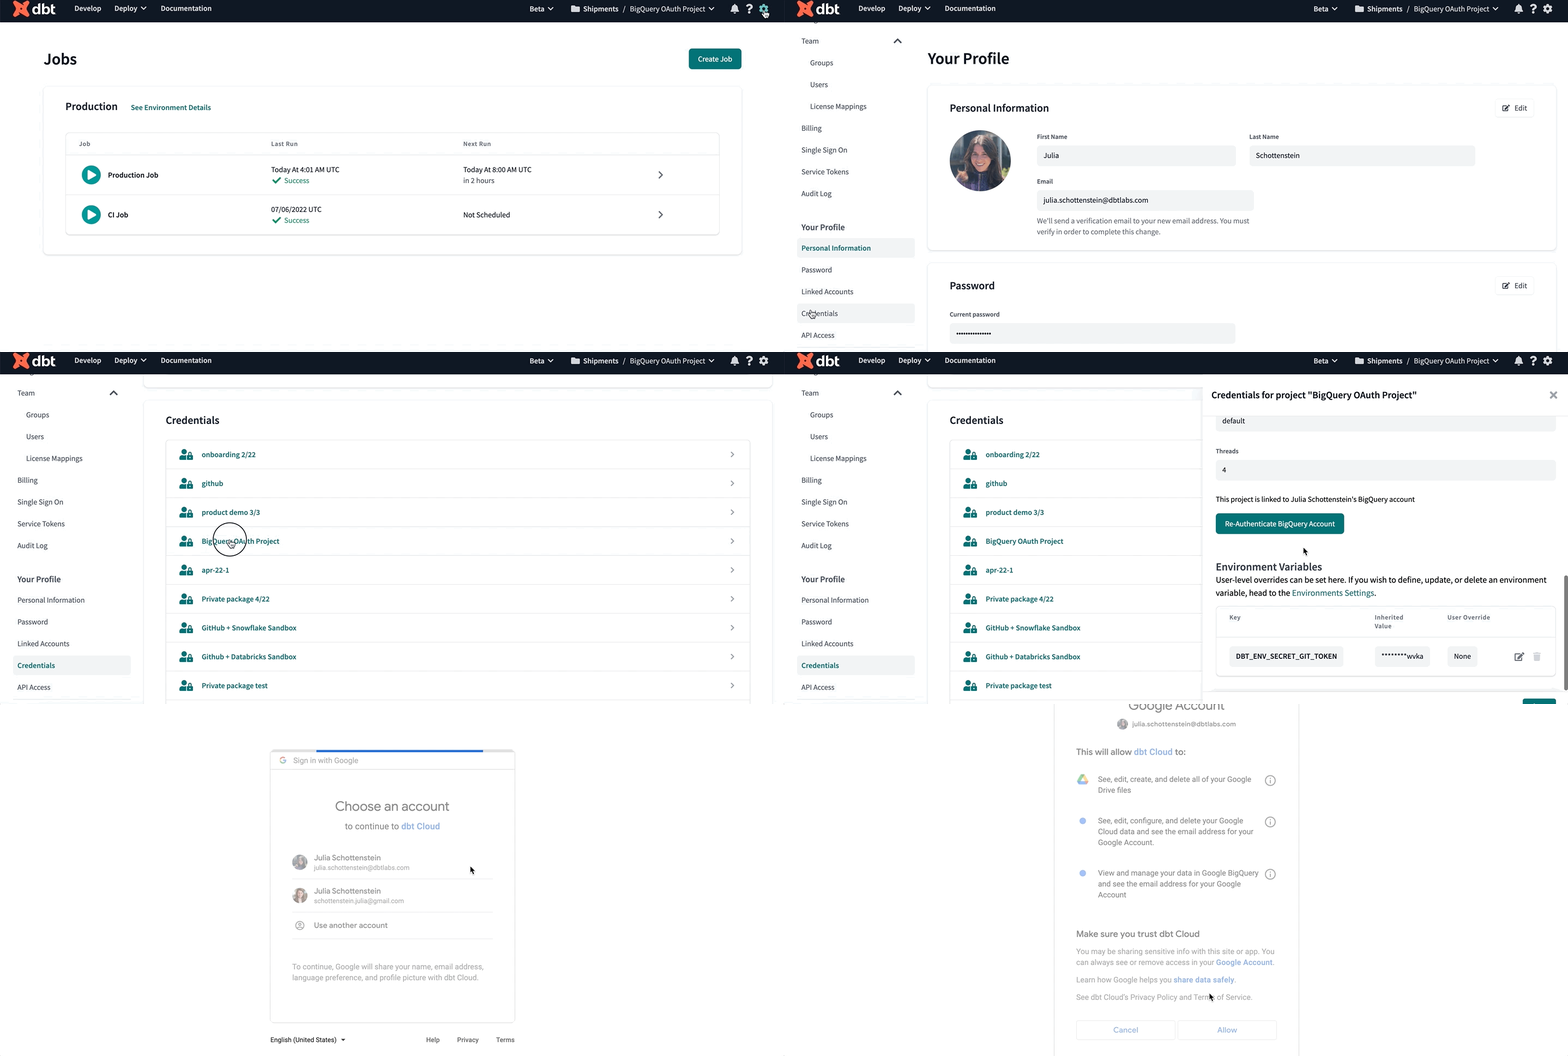
Once the BigQuery OAuth app is set up for a dbt project, each dbt user will need to authenticate with BigQuery in order to use the Studio IDE. To do so:
- Navigate to your account name, above your profile icon on the left side panel
- Select Account settings from the menu
- From the left sidebar, select Credentials
- Choose the project from the list
- Select Authenticate BigQuery Account
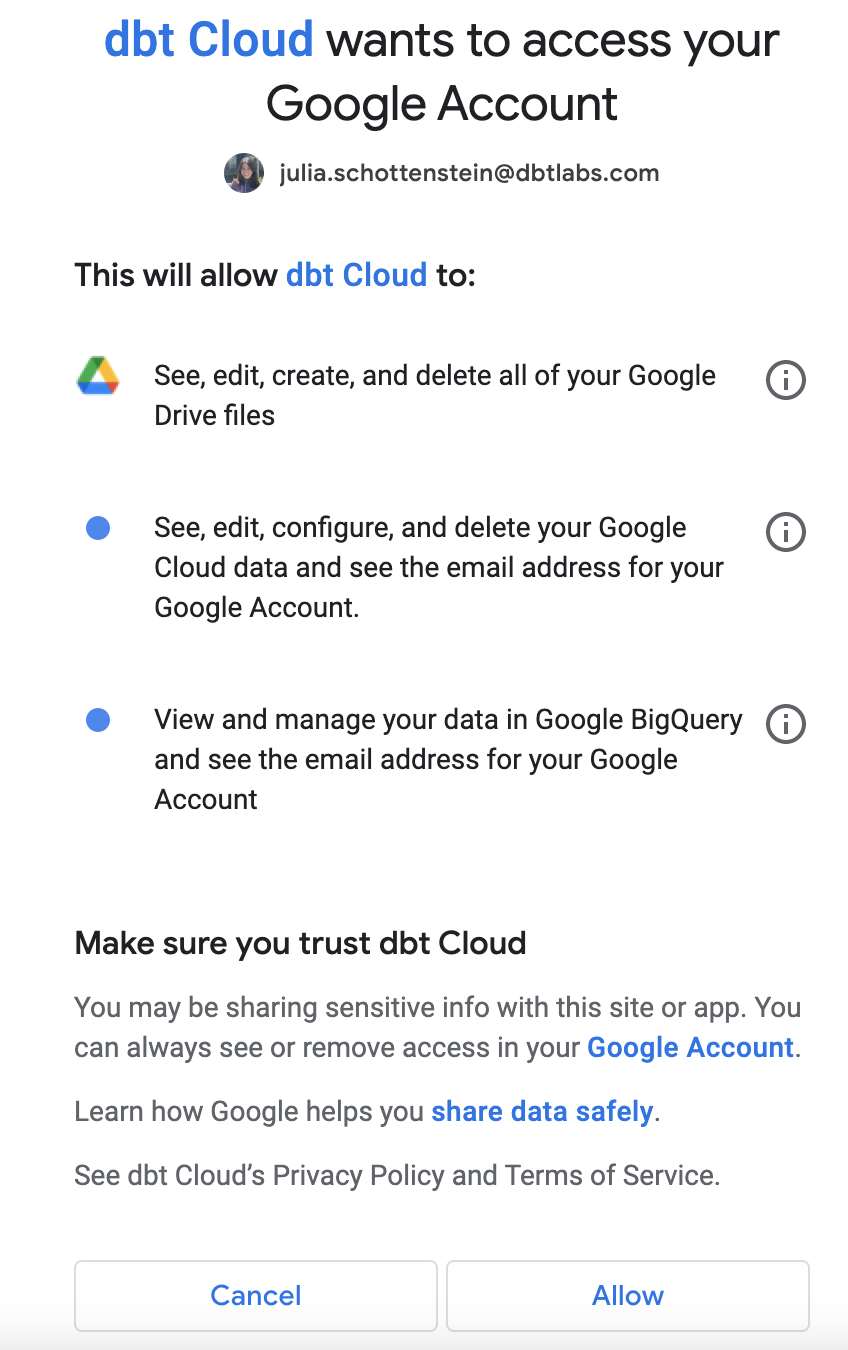
You will then be redirected to BigQuery and asked to approve the drive, cloud platform, and BigQuery scopes, unless the connection is less privileged.
Select Allow. This redirects you back to dbt. You are now an authenticated BigQuery user and can begin accessing dbt development tools.
Set up BigQuery Workload Identity Federation Enterprise
Workload Identity Federation (WIF) allows application workloads, running externally to dbt, to act as a service account without the need to manage service accounts or other keys for deployment environments. The following instructions will enable you to authenticate your BigQuery connection in dbt using WIF. Currently, Microsoft Entra ID is the only supported identity provider (IdP). If you need additional IdP support, please contact your account team.
Set up dbt
To configure a BigQuery connection to use WIF authentication in dbt, you must set up a custom OAuth integration configured with details from the Entra application used as your workpool provider in GCP.
In dbt:
- Navigate to Account settings --> Integrations
- Scroll down to the section for Custom OAuth Integrations and create a new integration,
- Fill out all fields with the appropriate information from your IdP environment.
- The Application ID URI should be set to the expected audience claim on tokens issued from the Entra application. It will be the same URI your workpool provider has been configured to expect.
- You do not have to add the Redirect URI to your Entra application
Create connections in dbt
To get started, create a new connection in dbt:
- Navigate to Account settings --> Connections.
- Click New connection and select BigQuery as the connection type. You will then see the option to select BigQuery or BigQuery (Legacy). Select BigQuery.
- For the Deployment Environment Authentication Method, select Workload Identity Federation.
- Fill out the Google Cloud Project ID and any optional settings you need.
- Select the OAuth Configuration you created in the previous section from the drop-down.
- Configure your development connection:
- BigQuery OAuth (recommended)
- Set this up in the same connection as the one you're using for WIF under
OAuth2.0 settings
- Set this up in the same connection as the one you're using for WIF under
- Service JSON
- You must create a separate connection with the Service JSON configuration.
- BigQuery OAuth (recommended)
Set up project
To connect a new project to your WIF configuration:
- Navigate to Account settings --> Projects.
- Click New project.
- Give your project a name and (optional) subdirectory path and click Continue.
- Select the Connection with the WIF configuration.
- Configure the remainder of the project with the appropriate fields.
Set up deployment environment
Create a new or updated environment to use the WIF connection.
When you set your environment connection to the WIF configuration, you will then see two fields appear under the Deployment credentials section:
- Workload pool provider path: This field is required for all WIF configurations.
Example:
//iam.googleapis.com/projects/<numeric_project_id>/locations/global/workloadIdentityPools/<workpool_name>/providers/<workpool_providername> - Service account impersonation URL: Used only if you’ve configured your workpool to use a service account impersonation for accessing your BigQuery resources (as opposed to granting the workpool direct resource access to the BigQuery resources).
Example:
https://iamcredentials.googleapis.com/v1/projects/-/serviceAccounts<serviceaccountemail>:generateAccessToken
If you don’t already have a job based on the deployment environment with a connection set up for WIF, you should create one now. Once you’ve configured it with the preferred settings, run the job.
